A kitchen sink sprayer is one of the most convenient and versatile tools in your kitchen. It allows for easy rinsing, cleaning, and even filling pots that don’t fit under the faucet. However, like any plumbing fixture, sprayers can develop problems over time—especially leaking.
A leaking kitchen sink can be both annoying and wasteful, causing water to puddle under the sink, drip on countertops, or spray uncontrollably. Fortunately, in many cases, you don’t need a plumber. You can fix the issue yourself with basic tools and a little know-how.
In this comprehensive guide, we’ll explain how to identify the source of the leak, the tools you’ll need, and step-by-step instructions to fix it. We’ll also cover common causes, tips for maintenance, and when it’s time to replace your sprayer.
✅ Common Causes of a Leaking Kitchen Sink Sprayer
Before we fix the issue, it’s important to understand what could be causing the leak. Here are the most common reasons your kitchen sink sprayer might be leaking:
-
Loose or worn-out connections
-
Damaged or cracked hose
-
Faulty or clogged spray head
-
Worn-out washers or O-rings
-
Internal valve malfunction
-
Teflon tape deterioration on threaded connections
Identifying the cause will help you choose the best method to repair the leak.
🧰 Tools & Materials You Might Need
To fix your kitchen sink sprayer, gather the following tools and materials:
-
Adjustable wrench or channel-lock pliers
-
Teflon (plumber’s) tape
-
Replacement washers or O-rings
-
New spray head or hose (if necessary)
-
Screwdriver (flathead and Phillips)
-
Bowl or bucket (to catch any dripping water)
-
Cleaning cloth or towel
🔧 Step-by-Step: How to Fix a Leaking Kitchen Sink Sprayer
Step 1: Identify the Leak Location
Turn on the faucet and activate the sprayer. Carefully observe:
-
Is water dripping from the handle or nozzle?
-
Is it leaking from the hose under the sink?
-
Are the connections at the base leaking?
Knowing the exact source will determine whether you need to repair or replace a part.
Step 2: Turn Off the Water Supply
Before doing any repair work, turn off the water supply to the sink. You’ll usually find shut-off valves under the sink. Turn them clockwise to close. Then, squeeze the sprayer trigger to release any remaining pressure and water in the hose.
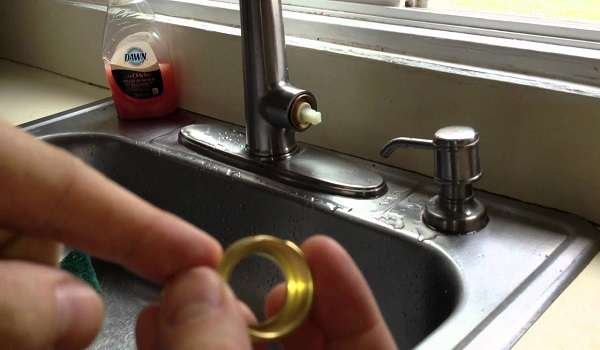
Step 3: Inspect the Sprayer Head
If the leak is coming from the nozzle or handle, unscrew the sprayer head from the hose.
-
Check for worn washers or debris inside the head.
-
Clean any sediment or gunk with vinegar or a brush.
-
Replace damaged washers or O-rings.
If cleaning doesn’t fix it, consider replacing the sprayer head entirely—it’s often inexpensive and available at any hardware store.
Step 4: Check the Hose
If water is leaking from the hose, inspect it closely:
-
Look for visible cracks or splits.
-
Flex the hose slightly to find hidden damage.
-
Check the connections at both ends (sprayer head and base of the faucet).
If the hose is damaged, remove it using pliers and replace it with a compatible new hose. When installing the new one, wrap Teflon tape on the threaded connections to prevent future leaks.
Step 5: Tighten Loose Connections
Sometimes, the issue is simply a loose nut or connector.
-
Use a wrench to gently tighten connections at the base and where the hose connects to the faucet.
-
Avoid overtightening, as this can crack plastic components or strip threads.
Step 6: Reassemble and Test
Once all parts have been cleaned, repaired, or replaced:
-
Reattach the sprayer head and hose securely.
-
Turn on the water supply valves.
-
Test the sprayer for leaks by turning on the faucet and spraying.
If no water leaks out and the spray is consistent, congratulations—you’ve fixed your kitchen sink sprayer!
🛑 When to Replace Instead of Repair
Sometimes a leak is a sign that the whole unit is failing. You may want to replace the kitchen sink sprayer if:
-
The plastic is brittle or cracked
-
The hose is old and stiff
-
You’ve tried replacing washers and it still leaks
-
Mold or mildew has built up inside
-
The cost of repair parts is close to the cost of a new sprayer
Modern sprayer kits are inexpensive and come with detailed installation instructions.
💡 Tips to Prevent Future Leaks
To extend the life of your kitchen sink sprayer and prevent future leaks, follow these tips:
-
✅ Don’t yank or twist the hose aggressively
-
✅ Regularly clean the nozzle to prevent clog buildup
-
✅ Periodically check under the sink for moisture
-
✅ Use Teflon tape during installation for leak-proof connections
-
✅ Turn off the faucet gently—high pressure can stress internal components
🛠 Alternative: Upgrade to a Pull-Down Faucet
If you’re constantly dealing with leaks or an outdated sprayer setup, consider upgrading to a pull-down faucet. These modern fixtures integrate the sprayer into the faucet itself, eliminating the need for a separate hose and reducing leak points.
🔚 Conclusion
A leaking kitchen sink sprayer can be frustrating, but with a little time and effort, it’s usually a quick DIY fix. By identifying the source of the leak, using the right tools, and following these step-by-step instructions, you can get your sprayer back in working condition without calling a plumber.
Whether it’s replacing a worn-out washer or installing a new hose, fixing your kitchen sink sprayer saves water, money, and unnecessary stress. And if all else fails, a modern upgrade can improve both your kitchen’s function and style.